Mini Updates

Crafts Work Search

7.7.10

How-To: Popsicle Stick Harmonica

Posted On 10:40 by evian | 0 commentaires


Diy harmonica: This A DIY harmonica from mayamade.blogspot.com, and can't wait to try it with my kiddos.

harp playing

The other day my mother made these little diy harmonicas with my daughter. They were an instant hit! With a little blowing, they make a satisfying sound that can change pitch by moving the paper sliders up and down. Very cool.  We're going to make a bunch and have a backyard Forth of July parade with harmonicas for everyone! You might want to also... or at least gather the simple supplies so that you can make some whenever the need arises for a little music.
MATERIALS
  • 3 rubber bands: 1 wide, 2 small
  • two popsicle sticks
  • two pieces of sturdy paper 3/4 inch wide and long enough for each side to fold over completely (ours was 2 1/4)
  • tape
How to Make
  1. Gather materials.   
  2. Lay one stick on top of the other with the paper strips spaced like in the photo.  
  3. Fold over each piece of paper.
  4. Secure paper with a little tape. Tape shouldn't touch the sticks at all.
  5. Carefully slip out the bottom stick.
  6. Stretch the longer rubber band around the length of the top stick. Place the bottom stick directly under it and secure them both with the two smaller rubber bands.
Done! Blow and make some music!
harp tute
harp tute 2
harp tute 3

Stumble
Delicious
Technorati
Twitter
Digg
Facebook
Reddit

25.6.10

How to Make a Paper Balloon Origami (Water Bomb)

Posted On 14:18 by evian | 0 commentaires


In this video, I explain how to make a Paper Balloon, also known as the Water Bomb. All that is required is a piece of printer paper (any size should work). Scissors are optional, but make things a little easier if the paper is not already square.

WATER BOMB - To make this a water balloon/bomb, create a slow, fine stream of water at the sink. Try not to get the outside of the balloon wet when filling. Do NOT fill the balloon too much, or it will leak faster. THROW IT at someone :-) ... not in the house though... bye.
Let me know what you guys think by commenting and rating! Thanks for watching.

Stumble
Delicious
Technorati
Twitter
Digg
Facebook
Reddit

How To Make An Origami Paper Bomb

Posted On 14:14 by evian | 0 commentaires


A short video on how to make an Origami Paper Bomb

Stumble
Delicious
Technorati
Twitter
Digg
Facebook
Reddit

15.4.10

How to create Vintage buttons BELT BUCKLE

Posted On 09:46 by evian | 0 commentaires


VINTAGE BUTTON BELT BUCKLE ACCESSORIES

vintage buttons belt buckle image
Materiels :
- 25 mm vintage button
- 1g 112 seed beads, grag matte metallic.
- 210 x 8mm cabochons, viverstone- 1g 142 seed beads, bronze
- 4 4mm freshater pearls
- Belt buckle ( tandg leather compang)

Preparing the suede

  • Start your project by selecting a buckle and suede to complement the button (a). make sure the button fits within the parameters of the buckle.
  • Measure the buckle and cut the suede to the exact size of the buckle (b). Glue the button to the center of the suede with E-6000 and let dry for 20 minutes (c) .

Stitching

  • Single thread a needle with 2 yd. (1.8m) of beading thread and tie a knot at one end. Bring the needle up from the underside of the ultrasuede ( about a bead’s width from the side of the button). Pull the thread until the knot is tight against the back of the ultrasuede.
  • Design from the center out : start the beadwork by backstitching a round of 112 gray beads around your cabochon (d).
  • Work backstitch 2 all the way around the button and weave the needle to the back of the suede. Pass the needle up from under the suede about a bead’s-width away from the first round . If there is room, you can backstitch another round as shown (e).
  • Glue the two10x8mm cabochons to the suede with E-6000. Flush against the second round of backstitching. You may want to use a ruler to make sure the cabs are centered on the sides of the button (f).
  • Backstitch a round of the gray 11°s around the small cabochons (g).
  • Backstich a single round of bronze 14°s around the cabs and the button (h).
  • Add freshwater pearls ( treating them as you would a bugle bead) stitching lengthwise to the inner corners of the cab and the button(i).

Finishing

  • This is the easiest finishing ever done ! Roll a thin layer of E-6000 on the back of the beadwork (j) and press the beadwork into the belt buckle. Let dry . wear your buckle with your favorite pair of jeans !.

Stumble
Delicious
Technorati
Twitter
Digg
Facebook
Reddit

13.3.10

How to make dazzling ring wire wraps

Posted On 14:17 by evian | 0 commentaires


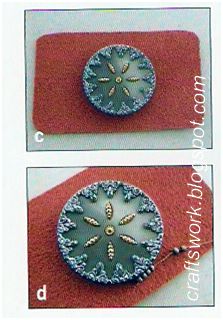
Technique to make dazzling rings using wire wraps to connect faceted crystals

images-dazzling-ring-beading-basic

Two shades of red , one dark and one light, create a rich background for a lone accent of yellow or violet-colors taken from a swatch of quilting fabric. Notice how the accent colors add life to the reds, even when used in small quantities. But color was not the only element this fabric inspired. To capture the mosaic-like surface of the fabric, i chose sparkling, faceted briolettes.

MATERIALS

One ring
- 6mm round Swarovsld crystal.
- 6-8 11 x 5 briolettes.
- 6 4mm round Swarovsid crystals
- 20 in (51cm) 22-gauge sterling silver wire.
- 8 in (20cm) 28-gauge craft wire, sliver
- Beadalon beading cord 006. White
- G-S Hypo cement
- Twisted-wire needies
- Chainnose pliers
- Fatnose piers ( optional)
- Diagonal wire cutters
- Ring mandrel or other ring-sized cylinder
- Metat file

1- Using a twisted-wire noedle and 8 in.(20cm) of beading cord, pick up six 4mm round crystals and sew through them again in the same direction, leaving a 3-in (7.6cm) tail.

2- Tie the tail and working thread fogether with a square knot (see Basics), and glue the knot. Sew through the next bead in the ring and pull the knot into the bead.3- Tie the working corda round the cord between beads with a half-hitch knot (Basics), and sew through the next bead. Repeat twice, then trim the cord. Repeat with the cord’s tail end.

4- String six to eight briolettes on an 8-in, piece of 28-gauge wire. Bend the beads into a circle, leaving a 3-in, tail on one end. Twist the long wire and the tail together to hold the beads in place.
5- Bring the long sire over the briolette to the right, over the wire in the circle, and down behind the briolettes.
6- Bring the wire up through the circle to the front.
7- Warp the wire around the circle again.

beading-basic-techniques-pic8- Repeat steps 5-7 with each briolette to lock them all in place. Hold the broiettes with your nondominant hand as you wrap, and prevent the tension from getting tights enough to break a bead.
9- Trim the wires and tuck them down between the briolettes with your pliers.

10- Turn the briolettes over. User the back of the cluster as the top surface of the petals.

11- Center a 6mm round crystal on the 22-gauge wire. Use chainnose pliers to bend the wire as shown in the photo. Don’t bend the wire against the crystal or the crystal may crack.

12- To assemble the flower, string the 4mm crystals and the broiettes onto the wire ends and slide them against the 6mm crystal . sperate the wires behind the briolettes.


13- Hold the flower in place on a ring mandrel or other cylinder. Make sure the band is slightly larger than the diameter of your ligner. Wrap each end of the wire around the mandrel two times.

14- Working with one end at a time, col the wire under the flower with two or more wraps. These support the briolette petals. make an additional wrap or two it needed, then remove the ring from the mandrel.

15- Wrap one wire around the band three to four times. Use flatnose pliers to hold the band wires together as you wrap. Trim the wire on the inside of the band , pinch the end against the band with pliers, and file the end. Repeat on the other side.

16- Side the ring back on the mandrel to reshape the band.

Stumble
Delicious
Technorati
Twitter
Digg
Facebook
Reddit

2.3.10

How to create a CAMEL Paper crafts

Posted On 06:10 by evian | 0 commentaires


Origami Animals Folding Instructions : CAMEL

image_origami_animal_camel

1- Fold top half down.

2- Open out.

3- Flatten.

pic_Origami_Animals_camel_Instructions_steps1-34- Repeat the same folds on the other side.

5- Make creases as shown.

6- Fold flap up flatten inward along the creases.

7- Repeat the same folds on the other side.

8- Pull out.
image_Origami_Animals_camel_Instructions_steps4-89- Turn over.

10- Flod down et top and flatten along the creases.

11- Make creases

12- Flatten along the creases with left over right and repeat the same folds on the botton side.images_Origami_Animal_camel_Instructions_steps18-21

Stumble
Delicious
Technorati
Twitter
Digg
Facebook
Reddit

16.2.10

Paper Aircraf Construction :Incredibly simple glider

Posted On 05:31 by evian | 0 commentaires


Incredibly simple glider
image_paper_aircraf_incredibly_simple_gliderThis gilde ris so simple even my mother can fold one ! it’s a beaut little gilder because no matter where you are you can whip one up in no time to throw at your nearest politician. Lawyer, accountant or anyone you happen to dislike at the time !

1- Fold paper in half lengthwise. See the line of diagonal dots ? Bend one corner of youincredibly_simple_glider_construction_picr A4 sheet along that line and crease one end, A. this will establish the position of your first fold. Now fold along line AB

2- Fold sides in to meet centre crease as shown.

3- Fold nose in so that corners C and D meet edges E and F.

4- Mountain fold the glider in half.

5- Fold down the wings in roughly the same position as shown.

6- Your incredibly simple glide ris now ready to throw.


Throwing Instructions


Throw at level angle and gently.
Do not throw hard as the fold may open out. However, by applying one or more of the advanced concepts , this glider can fly faster. I’ll leave is to you to work out which concept to use.

Stumble
Delicious
Technorati
Twitter
Digg
Facebook
Reddit
 

Instructions in all type of Handicrafts Copyright © 2010 LKart Theme is Designed by Lasantha